Ai Prompts, Free LUTs, Lightroom Presets, iPhone Wallpapers, Camera Raw Presets & More
Adobe Photoshop 2024 | Generative Fill
Adobe Photoshop 2024 | Generative Fill
Generative Fill is a new feature in Photoshop that uses artificial intelligence to generate new content based on the existing content in an image. It is still under development, but it has the potential to revolutionize the way we edit photos.
In this article, we will discuss some of the most useful tricks for using Generative Fill.
1. Extend your images
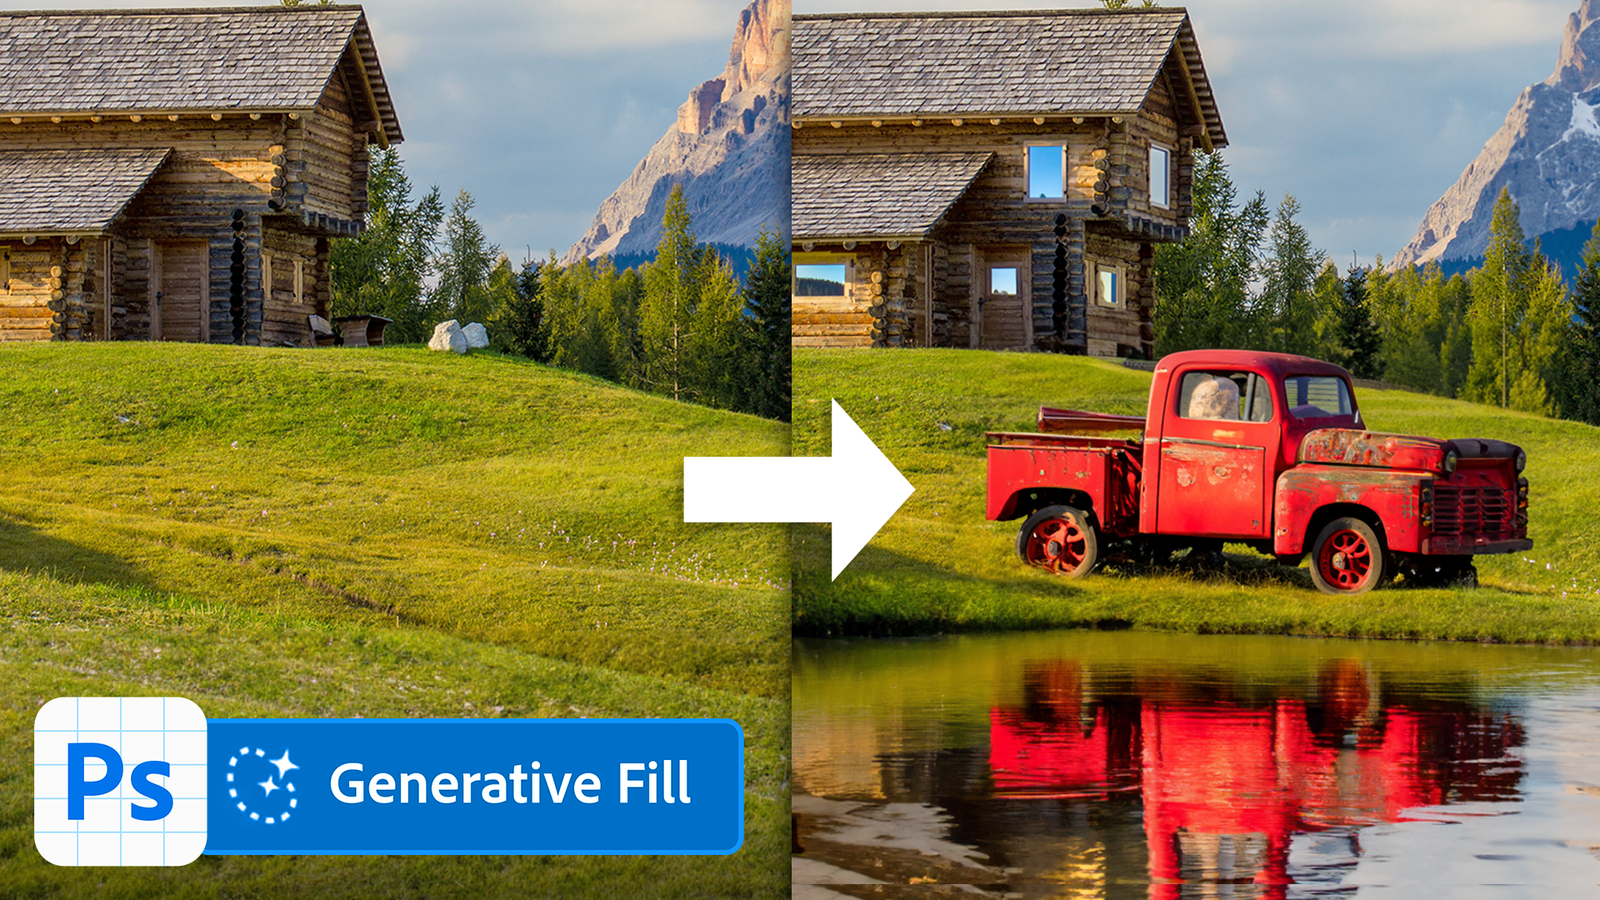
One of the most common uses for Generative Fill is to extend the edges of an image. This can be useful for creating a wider or taller image, or for removing unwanted objects from the edges of an image.
To extend an image using Generative Fill, simply select the area that you want to extend and then click on the Generative Fill button. Photoshop will then generate a new image that extends the selected area.
Adobe Photoshop 2024 | Generative Fill
You can also use Generative Fill to extend the canvas beyond the original image boundaries. This can be useful for creating a larger canvas for your image, or for adding new elements to the image.
2. Upscale your images
Another common use for Generative Fill is to upscale images. This can be useful for printing images at a larger size, or for displaying images on high-resolution screens.
To upscale an image using Generative Fill, simply select the image and then click on the Generative Fill button. Photoshop will then generate a new image that is upscaled to the desired resolution.
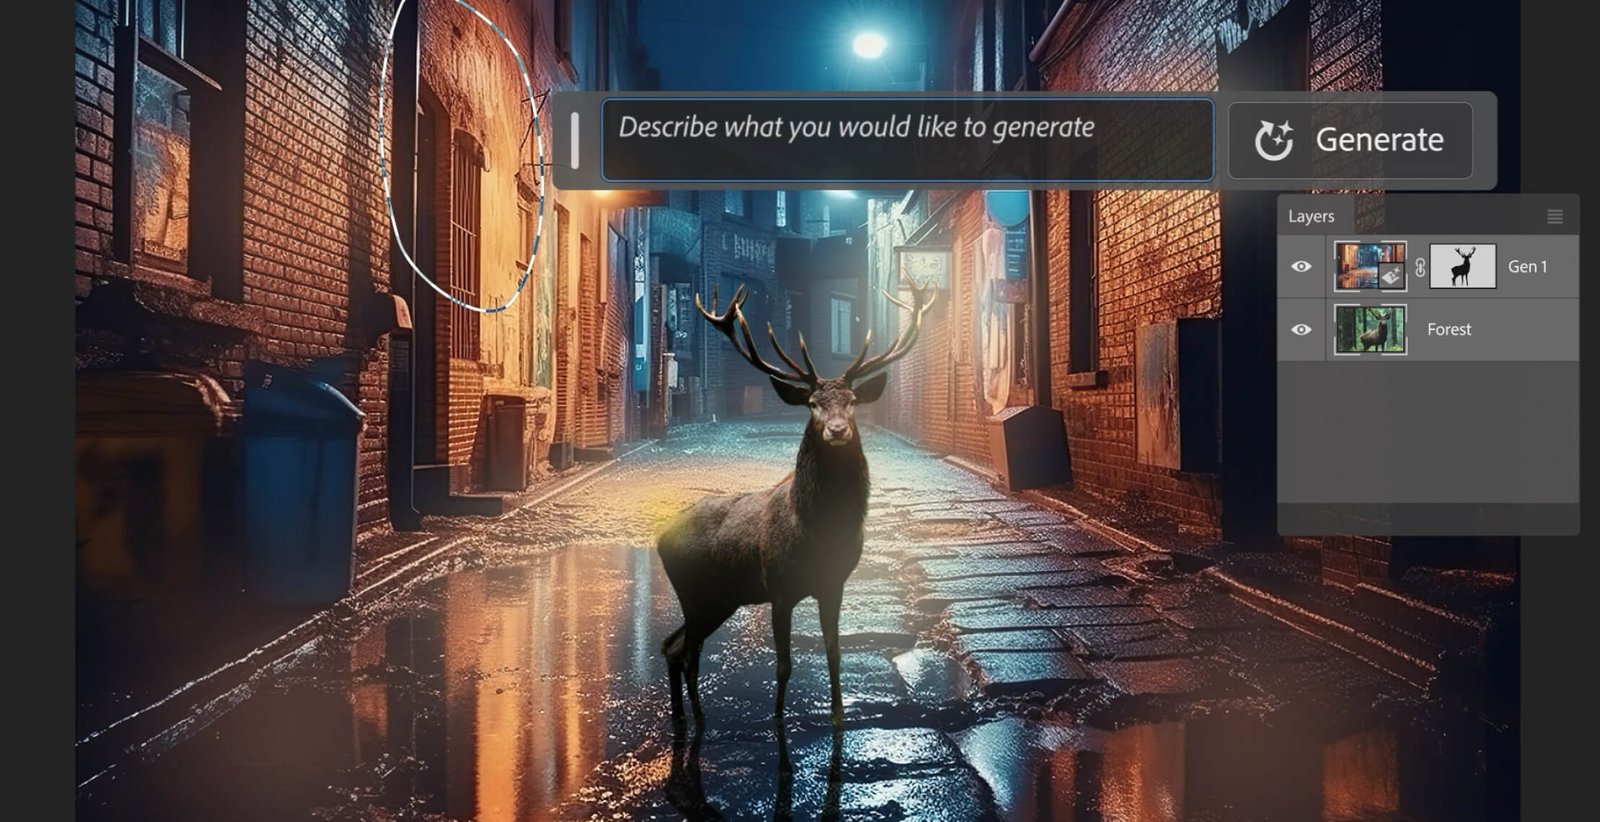
Generative Fill can also be used to add or remove subjects from images. This can be useful for creating composite images, or for removing unwanted objects from images.
To add a subject to an image using Generative Fill, simply select the area where you want to add the subject and then click on the Generative Fill button. Photoshop will then generate a new image with the subject added to the selected area.
To remove a subject from an image using Generative Fill, simply select the subject and then click on the Generative Fill button. Photoshop will then generate a new image with the subject removed from the image.
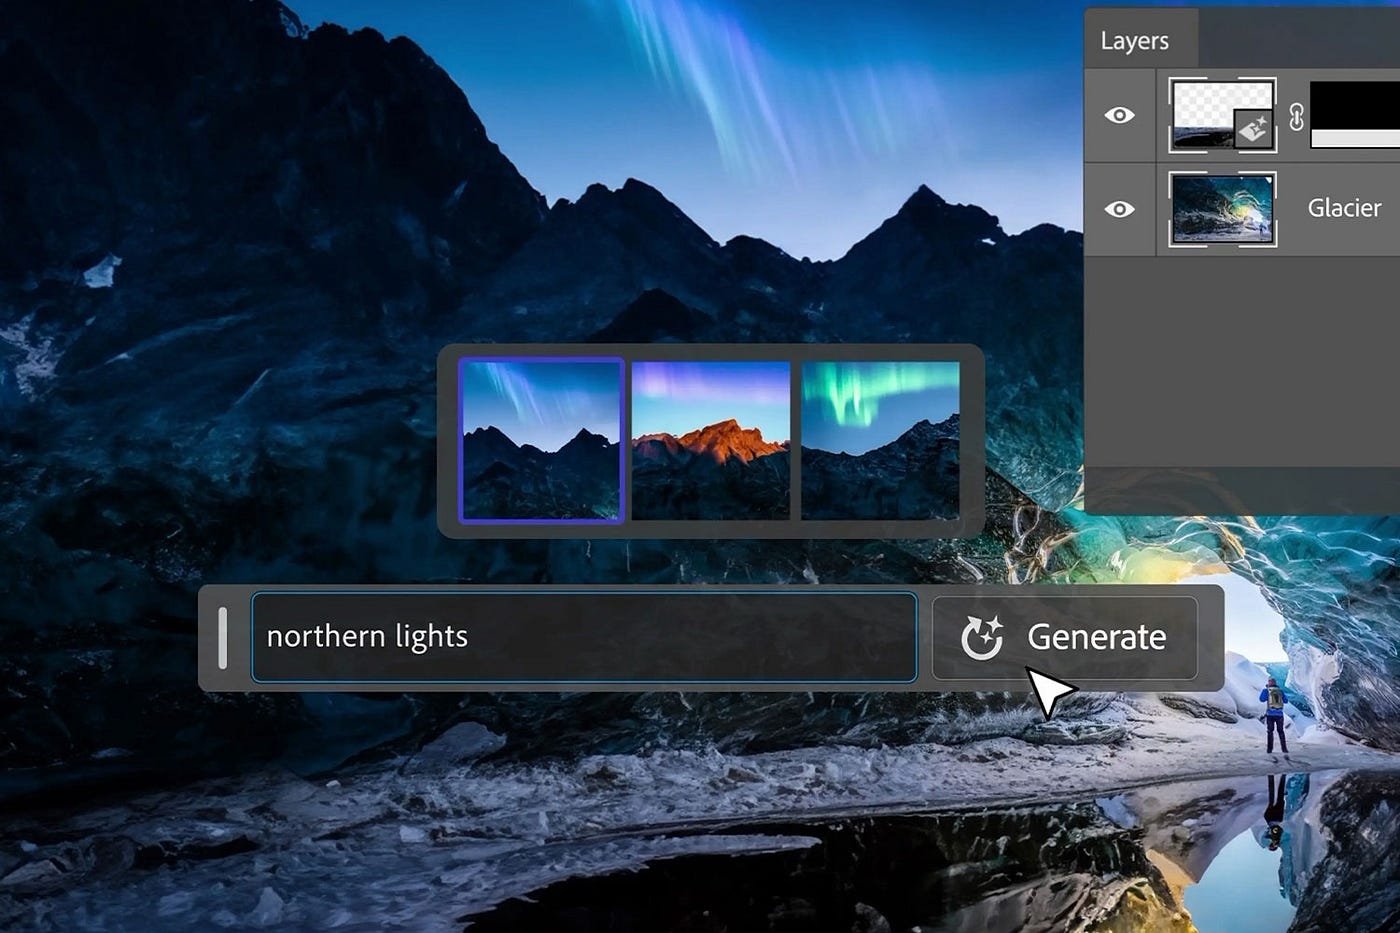
4. Create new backgrounds
Generative Fill can also be used to create new backgrounds for images. This can be useful for creating more interesting or creative images.
To create a new background for an image using Generative Fill, simply select the background area and then click on the Generative Fill button. Photoshop will then generate a new background for the image.
You can also use Generative Fill to create custom backgrounds for your images. To do this, simply create a new image with the desired background and then use Generative Fill to copy the background into your image.
Generative Fill can also be used to repair damaged images. This can be useful for removing scratches, blemishes, and other imperfections from images.
Adobe Photoshop 2024 | Generative Fill
To repair a damaged image using Generative Fill, simply select the damaged area and then click on the Generative Fill button. Photoshop will then generate a new image with the damaged area repaired.
6. Create abstract art
Generative Fill can also be used to create abstract art. This can be done by using Generative Fill to generate new textures and patterns.
Adobe Photoshop 2024 | Generative Fill
To create abstract art using Generative Fill, simply select a random area of an image and then click on the Generative Fill button. Photoshop will then generate a new image with the selected area filled with a random texture or pattern.
Tips for using Generative Fill
Here are some tips for using Generative Fill:
Use a large selection area. The larger the selection area, the better Generative Fill will be able to generate new content. Adobe Photoshop 2024 | Generative Fill
Use a variety of prompts. Generative Fill can be used to generate a wide variety of content, so try using different prompts to see what results you get. Adobe Photoshop 2024 | Generative Fill
Experiment with the settings. Generative Fill has a number of settings that can be adjusted to affect the generated content. Experiment with these settings to find what works best for your image. Adobe Photoshop 2024 | Generative Fill
Use Generative Fill with other Photoshop tools. Generative Fill can be used in conjunction with other Photoshop tools to create more complex and realistic effects. For example, you can use Generative Fill to generate a new background for an image and then use the Content Aware Fill tool to blend the new background into the image. Adobe Photoshop 2024 | Generative Fill
Conclusion
Generative Fill is a powerful new tool that can be used to edit and create images in new and innovative ways. By following the tips in this article, you can learn how to use Generative Fill to improve your workflow and create stunning images. Adobe Photoshop 2024 | Generative Fill
Here are some tips for editing with AI in Photoshop:
Use Neural Filters for non-destructive editing. Neural Filters are a new set of AI-powered filters that can be used to enhance your photos in a variety of ways. They are non-destructive, meaning that you can always revert to the original image if you’re not happy with the results. Adobe Photoshop 2024 | Generative Fill
Use Generative Fill to create new content. Generative Fill is a powerful AI tool that can be used to create new backgrounds, add or remove subjects, and repair damaged images. Adobe Photoshop 2024 | Generative Fill
Use Super Resolution to upscale your images. Super Resolution is an AI feature that can be used to upscale your images without losing quality. This can be useful for printing images at a larger size or displaying them on high-resolution screens. Adobe Photoshop 2024 | Generative Fill
Use Select Subject to quickly select your subject. Select Subject is an AI feature that can be used to quickly and accurately select the subject of your photo. This can be useful for tasks such as creating masks or removing backgrounds. Adobe Photoshop 2024 | Generative Fill
Use Content-Aware Fill to remove unwanted objects. Content-Aware Fill is an AI feature that can be used to remove unwanted objects from your photos while seamlessly blending the surrounding pixels. Adobe Photoshop 2024 | Generative Fill
Here are some specific tips for using each of these features:
Neural Filters
To use Neural Filters, simply open your image in Photoshop and then click on the Filter menu. Select Neural Filters and then choose the filter that you want to use.
Each Neural Filter has a number of settings that you can adjust. Experiment with these settings to find what works best for your image.
To preview the results of the filter, simply click on the Preview button. To apply the filter, click on the OK button.
Generative Fill
To use Generative Fill, simply select the area of the image that you want to fill and then click on the Edit menu. Select Fill and then choose Generative Fill.
In the Generative Fill dialog box, you can choose from a variety of different content types. You can also adjust the settings of the Generative Fill tool to affect the generated content.
To preview the results of the Generative Fill, simply click on the Preview button. To apply the Generative Fill, click on the OK button.
Super Resolution
To upscale an image using Super Resolution, simply open the image in Photoshop and then click on the Image menu. Select Image Size.
In the Image Size dialog box, check the box next to Resample. Under Resample, select Preserve Details (Enlargement).
In the Pixels section, enter the desired image resolution.
Click on the OK button to upscale the image.
Select Subject
To select the subject of your photo using Select Subject, simply open the image in Photoshop and then click on the Select menu. Select Subject.
Photoshop will automatically select the subject of your photo. If the selection is not accurate, you can use the Refine Edge tool to adjust the selection.
Content-Aware Fill
To remove an unwanted object from your photo using Content-Aware Fill, simply select the object and then click on the Edit menu. Select Fill and then choose Content-Aware Fill.
Photoshop will automatically fill the selected area with pixels from the surrounding area. If the results are not satisfactory, you can use the Spot Healing Brush Tool or the Clone Stamp Tool to refine the fill.
By following these tips, you can learn how to use AI to edit your photos in a variety of ways. AI can be used to enhance your photos, create new content, and repair damaged images. Experiment with the different AI features in Photoshop to see what you can create.
Tags for Adobe Photoshop 2024 | Generative Fill
adobe photoshop,generative fill,photoshop,photoshop generative fill,photoshop generative ai,photoshop ai generative fill,generative fill photoshop,generative fill photoshop beta,adobe,photoshop ai,photoshop beta,photoshop tutorial,generative fill photoshop 2023,photoshop generative ai fill,generative ai,generative fill in photoshop,adobe photoshop tutorial,photoshop ai generative fill tutorial,learn photoshop,adobe firefly,photoshop generative, Adobe Photoshop 2024 | Generative Fill